You’ve decided / resolved that this is the year you start a travel blog. How, though? Presenting the 2018 edition of how to start a travel blog and make it rock.
Whether you’re about to start traveling or are in the middle of an adventure, a travel blog opens doors, shares your stories, and might even make you some money. This guide will take you through the entire process of starting a blog, using the knowledge and experience I’ve gained from 10 years of blogging, with everything updated for 2018.
This very travel blog has changed my life.
I started blogging in December 2007 when I was making plans to teach English in South Korea. I’d figured I’d just be writing to friends and family back home who wanted to know what South Korea was like. Some of my oldest posts are still online — they’re lame as hell, but you can still find them.
Fast forward about 8 months when I installed a hit counter (this was long before I had ever heard of Google Analytics) to see what sort of traffic my blog was getting… Thousands of hits every month?! Are you kidding me?! I was freaking out a little. Readers from 100+ countries were finding my blog, sometimes sharing stuff, and otherwise finding it useful… Since then, I’ve come to take blogging more seriously and professionally… and that’s enough tooting my own horn for now.
This page is dedicated to you and your future blog.
We’re going to go step by step through the entire process of starting a blog and making it rock. This is the way to do it in 2018, at least for anyone serious about starting a great travel blog. If you’re not blogging about travel, no worries — 98% of this is relevant to you as well. Just take out ‘travel’ and replace with your passion, whatever it might be.
One more thing: this page will contain affiliate links to the products and services I use myself. If you win, I win. Doesn’t cost you any extra. There will also be links to free stuff — again, stuff I use myself.
What do you want to blog about?
We’ll get to the technical stuff in a few minutes. Right now, start with a pen and paper. Yep, old-school. Brainstorm topics like:
- Things you find fascinating
- Places you’re planning to go
- Places you’ve already been
- The lifestyle you’re leading or want to lead
- Who you want to reach (older people, younger people, first-time travelers…)
Also think about why you want to blog:
What’s your purpose / reason for blogging? Most bloggers want to:
- Tell stories
- Make money
- Share their experiences with the world
- Establish their expertise as a traveler
There’s tons of other reasons, of course — so write down which ones are important to you.
Think of a name for your blog
This is the step where lots of experienced bloggers have screwed up — but you don’t have to.
When I started blogging, I was Chris in South Korea — my name plus the country I was teaching English in. Easy, right? Well, what happened when I left Korea? Or got a crazy-awesome offer to sell my blog? (Yep, people buy blogs.) When I moved to Thailand, I couldn’t blog about Thailand on a blog called Chris in South Korea… so I started a new blog called Chris in Thailand… Same problem.
A few rules to follow:
Avoid using your first name, the current year, common cliches like ‘wanderer’ or ‘nomad’, hyphens / dashes, and numbers. Cliches are boring, and hyphens/dashes or numbers can confuse people typing in your name. Think long-term – will this name be relevant in five years?
Must have an available .com domain name – no exceptions, not in 2018. Think of literally any blog you know. Its domain name is a .com. The dot-com is iconic, and instantly tells you it’s a website. It’s the default option on the web for almost anything on the website. Don’t think about this — just don’t accept anything else.
Remove the spaces and capitalization to check it as a domain name. Choose Spain sounds like a great name, until you make it look like a domain name and it becomes choosespain.com. Chooses Pain? Ick.
Exude you, your beliefs, your passions, and your focus. Go back to the list of what you want to write about. Any common themes here?
Stay classy. Picture your blog’s name in a major newspaper, or shared by your mom on Facebook. Would you be proud to see that? Yeah, Sex, Drugs, and Rock’n’Roll won’t work.
It’s better to grow into your name than grow out of it. It’s OK for your name to reflect your ambitions, like getting around the world, becoming an expert, or the like. There may be that ‘what then?’ question when that happens, but that’s better handled down the road.
Once you have a few possibilities…
Check that name’s availability on social media – while you could go to each site and try to register it, namechk.com automates this process. Type in your name and it’ll give you a simple answer whether it’s available. The few to focus on: Twitter, Instagram, and Pinterest,
Your name should indicate your angle – think budget vs. luxury, or local vs. worldwide focus. Just by looking at the name, someone should be able to say ‘I get what that website is about.’
Try to stand out from the crowd. Yep, this one’s hard, no doubt. Try, though. See if anyone else has used the words in your name in a different order
Some good news: words can be made-up. English is a funny language. As long as people can pronounce it and spell it, it’s fair game.
The final test: the radio test.
The radio test is this: if someone hears your name on the radio, can they type the name and go to your site without any mistakes?
Imagine you’re listening to the radio and the commercial tells you about this contest to win a million dollars. Enter to win! Just go to my-dash-winderful-dash-contest-dash-2018-dot-com to win big! Yeah, no one’s going to remember that, spell it right, or type it right…
Check names here:
Got a winning name? Great. Next step.
The technology of blogging – it ain’t so scary!
People hear words like ‘hosting’ and ‘servers’ and ‘WordPress’ and might immediately assume this stuff is above their heads. It’s not. You have at least a little bit of experience on the internet, and have learned (or forgotten) about a ton of stuff about it. I’ll start with some other terms for technical-sounding things, then gradually move to the correct terminology over time.
Today, there are lots of ways to blog…
Blogger. Squarespace. Medium, WordPress, and a number of other sites are all around to get you started blogging. They know that the longer you blog at one of them, the more likely you stick with them (familiarity and habits and all that). To their credit, most offerings make it easy to get started, but the simplest way to start isn’t the best way long-term.
Blogger and Medium are both free to blog on, and each has their own pros and cons. Squarespace is an excellent option, until it suddenly isn’t. WordPress.com (the free, hosted version) looks good, until you realize the various ways the platform won’t allow you to do what you want with your website.
It’s your website, so own it.
When I say own it, I mean ‘be in control of your site’. When your blog’s on Blogspot, you can’t run ads. Your choices of themes are limited, and it’s really hard to make your blog look like a full site. Blogspot can also change the rules of what’s allowed on their site. In short, sites that are ‘free’ have hidden costs.
To be sure, you can always import or export your stuff to switch to another service, but there’s a cost of time, money, link juice. It’s one of those things that’s easy to mess up if you don’t know what you’re doing and people often a hire a professional to do for them. Almost every blogger I know did this, but virtually every serious blogger uses WordPress
Why WordPress?
It’s free, it’s flexible, it’s relatively easy to get started, and perhaps most important, it lets you make your site your way. Whatever you’ve wanted to build, there’s a good chance someone’s built a plug-in, a theme, or a widget that’ll let you do it. Millions of sites have been built with the open-source technology, and there’s plenty of support channels of both the paid and un-paid variety.
There’s one important thing to note regarding WordPress — specifically, what’s called the self-hosted version and the wordpress.com version. You can start a blog on WordPress.com, but this has some of the same issues as Blogger does. Think of this as WordPress lite. The self-hosted version is installed and runs on your own hosting account — your own space on the host’s servers.
What you need to get your blog started
On the technical side, the checklist has three things:
- A server / hosting account
- A domain name
- Install WordPress
Since you’ll need the first two to do the third, we’ll focus on them first.
Think of a host as an apartment building. Each server they own is like an apartment in that building, and the posts and pictures of your blog are the furniture and other stuff in that apartment.
Buy a domain name
You can buy a domain name from plenty of places, including the host I’m about to recommend. It’s a little cheaper to do it on your own, however — and if you’ve never shopped at Godaddy before, the company is known for having plenty of coupon codes, including some that’ll sell you a .com domain name for $0.99. Yep, less than a buck. Be sure to uncheck the various add-ons they try to add along the way, especially since most of them are way overpriced. Another worthy company I use is Namebright, which offers free Whois privacy for your domain name and is very straightforward.
Important, you’ll need to connect this domain name to your hosting. We’ll get to that in a couple of minutes, so keep that tab open.
OK, so what do I need to do?
Pick a host. If you’ve read any ‘how to start a travel blog’ posts, you’ve probably seen Bluehost in some of their recommendations, even if those bloggers don’t use them. There’s a simple reason for that: they pay out some impressive affiliate fees. I used Bluehost for awhile, but I’ll recommend what I’m using today:

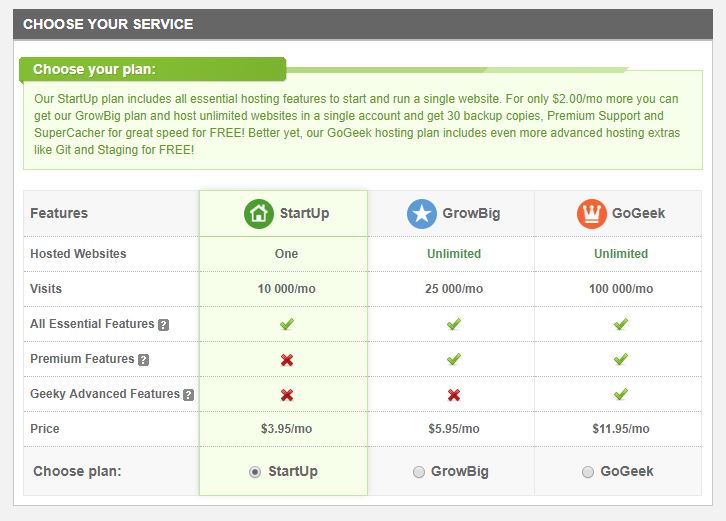
I’ve used Siteground for several years now and am happy to recommend them for any blogger starting out and all the way up through tens of thousands of hits a month. Their StartUp plan offers plenty to get you started, and naturally you can change to a higher-level plan as you need to.
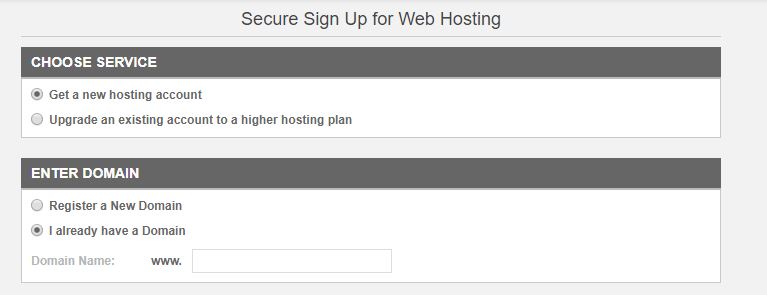
Start by clicking this link, then click ‘Sign up’:.
Get a new hosting account, then click ‘I already have a domain name’ and fill in the domain name you’ve already purchased:
Choose the Startup plan in green:
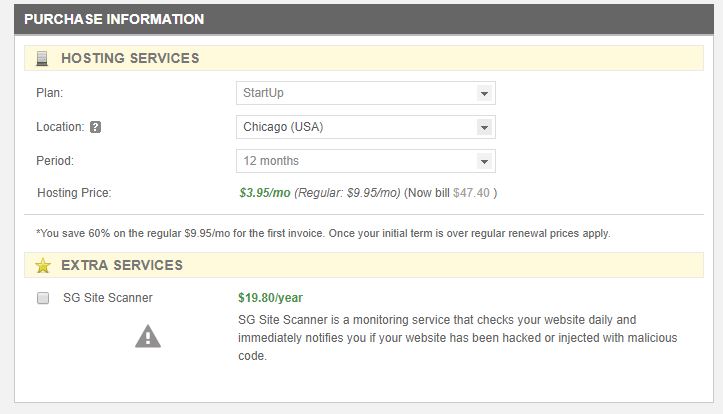
Choose your preferred location (I’d stick with Chicago) and the period of service (bear in mind you’ll only get the promo offer once, so consider getting 24 or 36 months. Uncheck that box next to the SG Site Scanner – no need to pay an extra $20 a year:
Pay, get your username and password, then log in at https://ua.siteground.com.
We’re not quite done with Siteground yet…
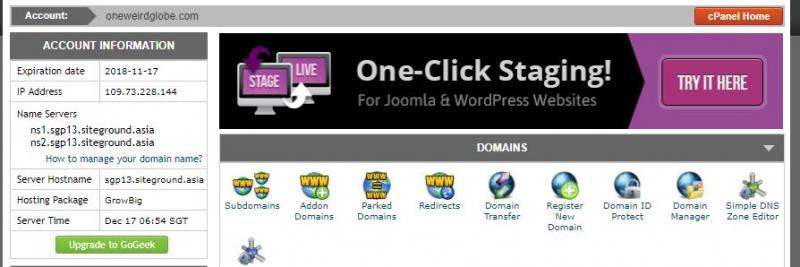
We’ll get to installing WordPress in a second. Even though WordPress is the tool you’ll be using once everything’s completely set up, you’ll want to bookmark Siteground (or the host you went with) and know how to access the cPanel. The cPanel is the host’s way of giving you more control over the server space you’ve paid for, and has far more tools than you’ll ever need. From the host’s perspective, this is where they’re looking at stats — that is, at the server level, not on the WordPress level.
For now, just know how to access it — from Siteground’s ‘My Accounts’ page, it’ll be the red button that says ‘Go to cPanel’.
Domain name, meet hosting
With these two things set up, it’s time to make an introduction so that your domain name leads to your hosting. We need to find one piece of information (the URL of Siteground’s nameservers), then copy and paste them on the site where you bought your domain name. On Siteground, the nameservers are listed on the left sidebar:
Your nameservers may be different, since they’re based on the location you chose earlier. Copy one, then note which numbers are used (ns1, ns2, ns3)
Head back to the tab where you bought your domain name, then look for a place to update your nameservers. On namebright.com, this will look like this:
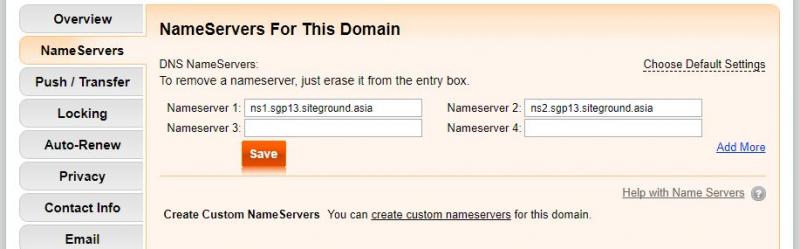
Again, copy and paste what you see on your cPanel, not what you see above.
Get secure
One reason I love Siteground for hosting is how simple it is to make your site secure. Without getting into all the technical details, you want to use the https protocol instead of the http. The ‘s’ stands for secure, and it also makes Chrome show that sweet green padlock:
![]()
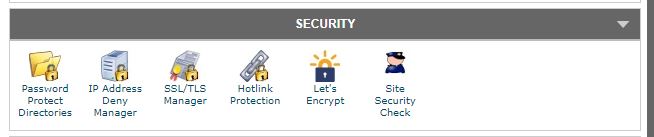
We’ll start from the cPanel —look for the Security menu, and click Let’s Encrypt:
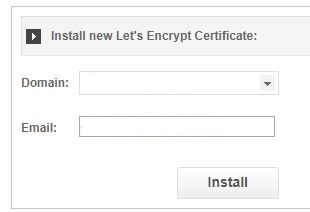
I’ll let you read more about Let’s Encrypt over here if you want all the details and technical information — the only thing you need to know is that it’s a ‘certificate authority’, and the certificate is what makes a website considered ‘secure’. On the next page, choose the domain and enter your e-mail, then give it a minute:
Next!
Install WordPress
With these other steps done, this part’s usually the easiest part. Head back to Siteground’s cPanel (from the ‘My Accounts‘ page, ciick the red ‘Go to cPanel’ button), then look for the WordPress button under Autoinstallers:

Click the blue ‘Install’ button:
Choose whether you want to use the www version of your site or the non-www version. Either way, pick the https version, not the http version. You just finished installing the Let’s Encrypt certificate, so you’ll be starting with a secure site instead of adding it on later.
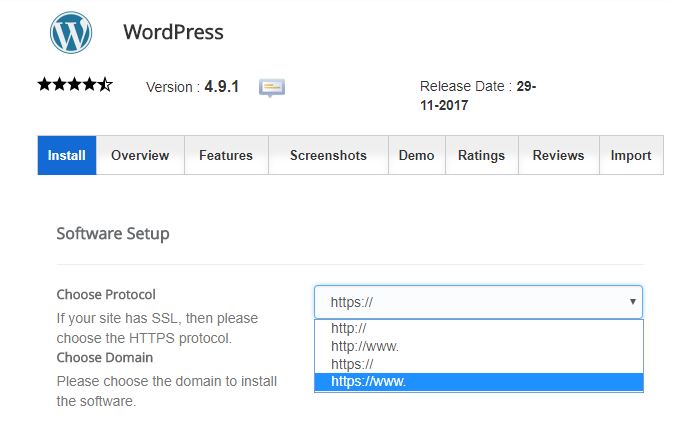
Note you’ll need to pick your domain name in the drop-down box in the ‘Choose Domain’ box. Don’t see it there? Open a chat with Siteground.
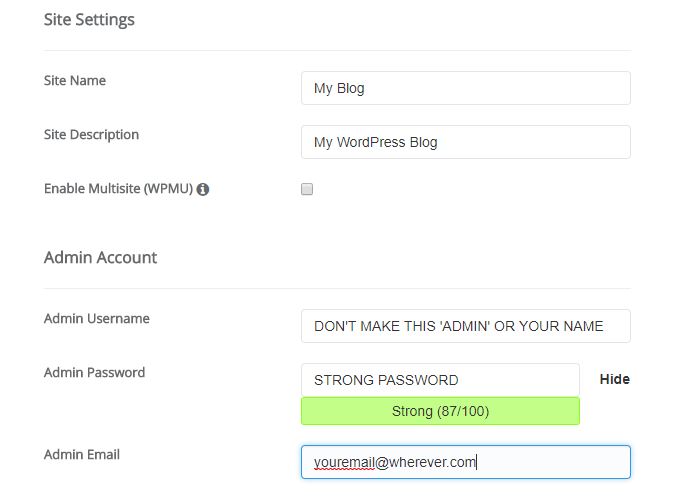
Next up: a couple of very important settings. Type the site name and description of your choice, then you’ll create a WordPress admin user and password. Don’t use ‘admin’ or your first name as your username because they’re easy to guess.
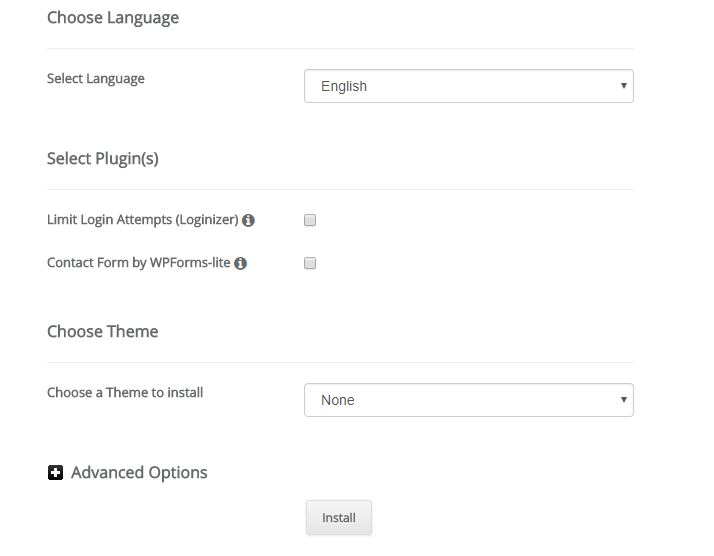
The last few options can be left just as they are: English language (unless you want to change to your native language), no theme, and no changes needed in the advanced options.
Hit install, then give it a couple of minutes. Once it’s installed, click the link or go to yourwebsite.com/wp-admin to log-in to WordPress.
Get to know WordPress
While getting to know WordPress will take some time, there are a few terms that are worth knowing from the very beginning:
Your theme is arguably the most important part of your website. It dictates the overall look and feel of the site, but also determines how flexible the various parts of the website are, along with where they’re placed.
Your plugins enable your site to have far more functionality than possible in the default WordPress setup. There are tens of thousands of plugins that add functionality, make it easier to create content, give you more options to customize things, and so on.
A widget is most commonly seen on the sidebar of a website. Widgets can include text, pictures, code, and plenty of other options.
A menu is most commonly displayed at the top of the page. Some themes make this menu stick to the top of the page.
WordPress allows you to create posts and pages. Posts will always have a date attached to them, while pages don’t. Posts will show up on your blog page, while pages won’t.
Your header and footer will appear at the top of every page on your site. In WordPress, they typically hold menus, logos, and sometimes widgets.
Get graphical
![]()
You win bonus points if you already have some skills in Photoshop or GIMP… but there’s no need for them these days. I’ve designed lots of stuff in frikkin’ PowerPoint that just worked — it’s not about the tool, it’s about the end result.
At a minimum, you’ll want two things for your new blog: a logo and some colors. The logo is going to go on your site, your business card, and on social media. Later on, you can get into headers / profile pictures for social media… but for now, let’s just pick these two things out.
Logos tell a story about your blog / brand. Wait, isn’t it really early to be thinking about my blog as a brand? Maybe. Most bloggers I know didn’t get serious with their logos or branding until they had started — and looking back, it’s something most people wish they had figured out sooner rather than later. You don’t have to get this perfect right away, but you will want to have some kind of logo.
If you have a graphic design friend, or if you’re a graphic designer yourself, rock on. You’ve already got this part figured out. Everyone else? Head over to Canva to try your hand at doing it yourself, or hire someone.
What about colors?
Among many other sites, colorpsychology.org and color-meanings.com features a plethora of information about the psychology of colors, the feelings that certain colors exude, and so on.
You might also choose your colors based on the things in your logo. I chose a dark blue and a bright green to represent the water and land that make up the world.
Choose a theme
….aaannndd back to WordPress! As previously mentioned, your theme dictates the look and feel of your site, so changing themes can mean your site will look completely different. Take a look at three different themes below:
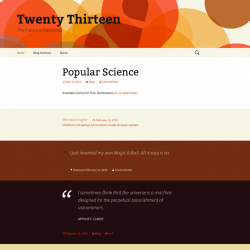
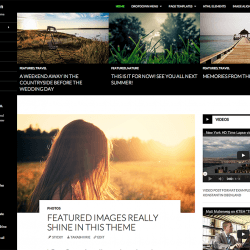
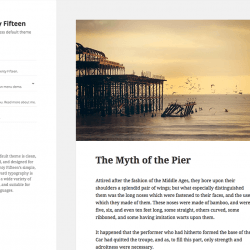
Each theme puts text, pictures, posts, sidebars, menus, and widgets in different places. Each theme has their own default color schemes and options to change things around.
Divi is the theme I’ve used on One Weird Globe for years.
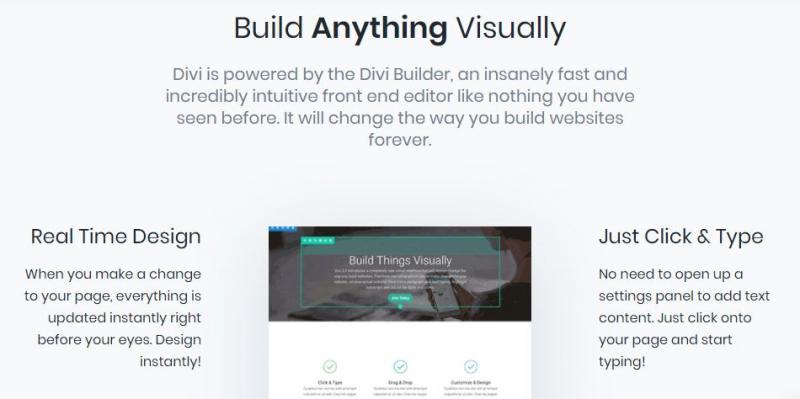
Designed by Elegant Themes, Divi is a great example of a visual page-builder theme, which makes building a page much like playing with Legos. Drag and drop different pieces around to make photos or text appear in different places or at different sizes. It’s very flexible and makes webpages as quickly as I can dream them up.
Before that, I used Valenti, which was a great theme as well. It offered a clean, classic look, but wasn’t as flexible as I liked. It’s still a good time.
What about free themes?
I like free themes in general. There are issues with some free themes, however:
- Some features are crippled unless you upgrade to the paid version.
- Support can be lacking, limited, or non-existent.
- Free themes have been known to harbor malware.
There are tons of free themes on wordpress.com alone, and there are plenty of others found in Google search results. As free themes go, the annual one produced by WordPress is a perfectly fine one to start with. Older ones are updated, so don’t feel like you have to use the most recent one if you like the look of an older one.
What about custom themes?
If you have several hundred dollars to burn, go right ahead. Some well-known bloggers have hired a programmer to create or heavily tweak a theme to give their site a unique look. This is overkill at this stage, though.
If you’ve chosen Divi, there’s one thing you need to do first…
Get your API key from Elegant Themes at https://www.elegantthemes.com/members-area/api/, or go Account > Your API Key to arrive here:
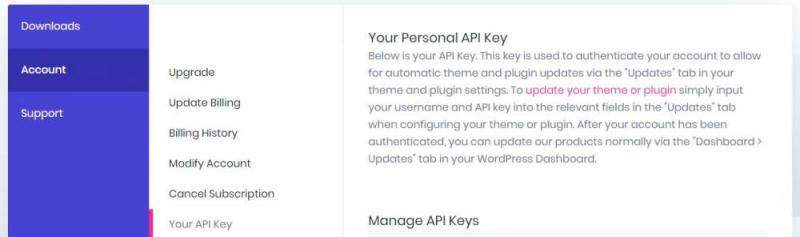
This API key is basically a password between your server and theirs, and will allow them to communicate about updates seamlessly. Copy this API key, then head back to WordPress. Paste it into Divi > Theme Options > Updates and type your username to set this up.
Next!
Choose some plugins
Plugins are what WordPress to do all sorts of fun stuff — and there are hundreds of thousands of them. Some are incredibly popular, but simply being incredibly popular doesn’t mean you should use it. Use a plugin to do a specific task. Don’t just add them at random. If any came pre-installed, look and see if that functionality is helpful to you. It’s probably not, and you can safely do what you typically with bloatware.
Installing a plugin is a four-step process:
- Search for the name of the plugin (or upload the .zip file )
- Click to install it
- Click to activate it
- Configure its options
That last part can be a bit tricky, since there isn’t a uniform place plugins always go. Some can be found under ‘Settings’ or ‘Tools’ on the left sidebar, while other plugins will add their own menu stuff.
Here are some great — and free — plug-ins I use:
- Akismet — WordPress’ own comment spam checker. This comes installed with WordPress because it’s that good. If you plan to allow comments on your site
- Pretty Links Lite — use this to make short links forward to long links, or perhaps cloak affiliate links.
- Q2W3 Fixed Widget — oddly named, but it’s great to ‘fix’ a widget to the side of the page instead of letting it scroll by,
- Sumome — a plethora of free tools all in one plugin. Will need to spend some time to figure out which of the modules will help you the most, but it’s worth it.
- WP-Optimize — you probably won’t need this immediately after starting your blog, but get into the habit of cleaning your website just as you would your house.
- WP Super Cache — in my opinion, the best of the free caching plugins. (The more popular one, W3 Total Cache, is more complicated and easier to mess up.)
- Yoast SEO — an easy, all-in-one tool to improve your site’s SEO. It’s not a fix-all, but it does make optimizing things easier.
One more thing to do… set up Google Analytics
Go to google.com/analytics, sign in using your Google account, then fill out their form. There are plenty of tools to give you analytics, but Google Analytics is the gold standard of tools. When you’re all set up, you should get a piece of code that looks like this:
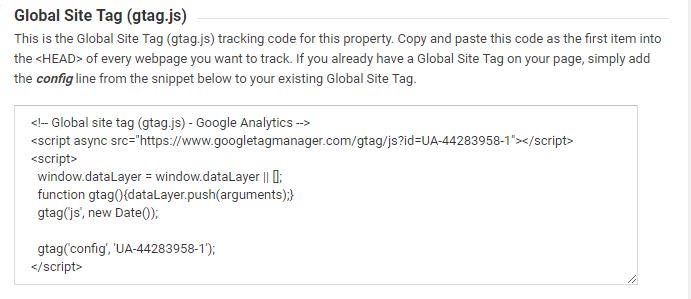
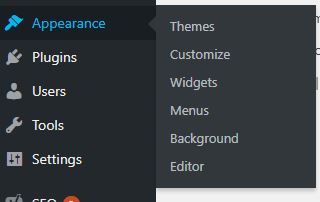
Copy and paste the code while you’re thinking about it – where, exactly? If you’ve installed Divi, no plugin is needed — head to Divi Theme Options > Integrations, then paste the code to the box that says ‘Add code to the < head > of your blog’. For other themes, they may have a similar box in the theme’s back-end. If nothing else, head to Appearance > Editor, then click on the header.php file and copy and paste it there.
Write some stuff
That’s right, almost 3,000 words into this post and we can finally do some writing! What took so long? Let’s review where we’ve been: we know why we write, we have a bit of a mission at heart, and now, we have a place of our very own to share that writing with the world. Go ahead, start thinking about your very first blog post! For most people, this can be a quick introduction to yourself, your mission statement, why you’re writing, and perhaps where your story begins. It’s kind of lame for most blogs, but it doesn’t have to be.
Three pages every blog MUST have
If you plan to take your blog seriously, these three pages are easy enough to set up:
- About – give you one guess what this is all about. Write about yourself first and foremost, but do get into what you want to do with your blog. Look at other bloggers ‘About’ pages (yes, including my own)
- Contact – again, pretty straightforward. Make a form using the Divi ‘Contact Form’ module or the Simple Basic Contact Form plugin. This does not have to be fancy, and can even just have your e-mail address there to start.
- Work With Me / Us – even just-starting-out bloggers can begin to think about working with companies. Get into the mindset of thinking of your blog as a business, even from the very beginning. Very, very, very few bloggers do.
Set up social media accounts
Whether you’re already on all the sites or are just considering how to have a presence on social media, it’s high time to get on them, or at least plant the flag. This one’s a biggie — assuming you checked on namechk.com and know they’re available, go grab ’em!
Register all accounts under your name, even if you don’t plan to use them. Why? Mainly to prevent someone else from grabbing them. You don’t want to wait until you’re a big superstar to realize someone grabbed your @Twitter username! As far as I know, none of the major services will deactivate your usernames for inactivity — and once anyone has the name, it’s devilishly difficult to get it away from them.
Which ones, and why?
The following:
- Facebook (specifically, a Page or Group — your call)
- Twitter (your blog’s name, shortened to 15 characters if necessary – cut vowels or excess words)
- Pinterest (profile names here can be up to 20 characters, but keep this consistent if at all possible)
- Instagram (usernames can be up to 30 characters, but keep this consistent if at all possible)
- Youtube (if planning to do video)
Forward thinking
We’re entering the home stretch of the post by thinking of things that can only make your blog better. A lot of bloggers don’t think about them until months or even years later, but you don’t have to make the same mistakes many others have.
Once you have everything set up, now would be a great time to schedule a one-on-one session to get advice / feedback about your blog. These last about an hour, and are entirely focused on ensuring things are correctly setup, brainstorming, and otherwise getting you set up for success.This is a paid service, naturally, and by the end of each session you’ll have plenty of things to add to your to-do list and confirmations of what’s working (or what isn’t).
OK, commercial over. Let’s get to it.
- Start a process for handling photos. This means thinking about how photos will go from your camera(s) to your computer, backed up in some way, then uploaded onto your blog. Photos straight from your camera are much too large for your upload, so they’ll need to be resized. In Divi, the main column width (AKA the big space your posts go) is about 800 pixels wide, and it will vary by theme.
- Create a schedule for posting you can commit to. Consistency is the key here, and quality trumps quantity every time. Some bloggers post once a week, while others aim for three times a week. When you’re just starting out, aim for twice a week — say Monday and Thursday — then go from there.
- Take a course or read a book. There are tons of them out them out there, so I’ll only mention the two I’ve reviewed and use myself:
- Where’s Sharon’s book How To Make Money From Blogging: The Ultimate Guide To Earning A Five Figure Income From Your Blog. Author Sharon Gourlay of Where’s Sharon? and Digital Nomad Wannabe is here to share what’s made her money. I reviewed it over here and re-read every so often to find things to improve.
- Superstar Blogging’s ‘The Business of Travel Blogging’ course, offered by Nomadic Matt . I reviewed it over here — it’s on the pricier side, but lifetime access and a secret Facebook group make it a worthwhile investment.
- Setup a newsletter. Mailchimp is the obvious winner, since it’s free until you reach 2,000 subscribers.
- Stay organized. From guest posts to photos that need editing to a bunch of other stuff, a blog can keep you busy. Use what you like, be it Evernote, a corkboard with cards, a dry erase board, paper and pen…
- Connect with other bloggers in Facebook groups. This is by far the most helpful tool you won’t see elsewhere. These Facebook groups won’t typically allow self-promotion, but they’re great for asking questions about blogging, travel, and the business of travel blogging. You’ll want to answer the group’s questions carefully when you click to join, and you’ll want to add your blog to your public Facebook profile to show you’re an active blogger.
- The Aspiring Travel Writer (some self-promotion opportunities here)
- The Business of Blogging (focusing on the making money and business side of things — no self-promotion here)
- Digital Nomad Entrepreneurs (not as tightly moderated as it could be, but still worthwhile)
- Digital Nomads Job Board (not every blogger is a digital nomad, but many are)
- DNW – Making Money From Blogging (Digital Nomad Wannabe’s free group, whether you’ve read Sharon’s books or not)
- Global Bloggers Network (little bit of this, little bit of that)
- Guest Post Request Group (Travel) (probably the easiest way to find places to write guest posts for – good for link building)
- Instagram for Nomads & Travelers (follow and learn about strategies)
- Nomads Collab (work with other nomads in some way)
- Superstar Blogger Travel Group (the group linked to the aforementioned course)
- Travel Advice by Travel Bloggers (only about travel advice, not blogging – ask fellow bloggers travel questions)
- Travel Bloggers (generically named, but great for asking advice)
- Travel Bloggers and Readers (bloggers and readers, but mostly bloggers. Self-promotion is fine here)
- Travel Bloggers Network (bit of overlap from other groups, but that’s to be expected
- Travel Collab Post Opportunities (when bloggers want more opinions, they come here – check the stickied post at the top for rules / expectations)
- The Travel Writer’s Trips,Tips & Pics (inspire and be inspired, self-promotion is fine here)
- Make the paradigm shift. When bloggers first start out, their posts usually read like a diary of places you’ve been. That’s fine and all, but the focus is all about you. The paradigm shift happens when you make your reader the focus of the blog —their needs and wants are what matters, not yours. It’s a matter of framing (Here’s a great hotel I stayed in when I visited London vs. Where to stay in London) and makes it look like you’re offering a great tool instead of just another diary post.
- Offer value in everything you publish. Keep giving people a reason to come back the next day, and the next day. Don’t publish unfinished posts or posts you haven’t edited / proofread.
What’s next?
Get an outside opinion, get help building your site, or just get some advice — I offer one-on-one sessions on Skype to help with all of these. Sessions last about an hour and are tailored to answer your questions. Pick your time here.

- Hostels 101: A Beginner’s Guide to Staying in a Hostel for the First Time - September 7, 2023
- 5 Best PARTY HOSTELS in Chicago [2023] - February 1, 2023
- 5 Best PARTY HOSTELS in Santiago! [2023] - January 31, 2023